Knowledge Base
Our Knowledge Base provides step-by-step guides, troubleshooting tips, and expert insights to help you manage VPS, dedicated servers, domains, DDoS protection, and more — all designed to make your experience with us fast, secure, and stress-free.

How to use the MTR command on Linux
MTR (Matt’s traceroute) is a program with a command-line interface that serves for network diagnostic and troubleshooting.
The advantage of this software is that it combines the functionality of the Ping command and the Traceroute. Just like a typical traceroute query, a query from the MTR command will show the route from a computer to a specified host.
The advantage over the traditional is that it will also provide a lot of statistics about each hop, like response time and percentage.
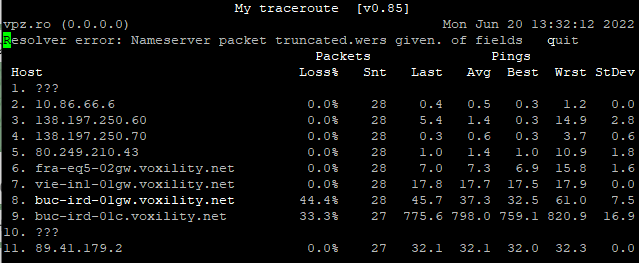
So, using the MTR command, you will get more information about the route and see problematic devices on the way. If you see a sudden increase in time of response or packet loss, you have found a bad link.
In a brief, the MTR command serves you for the following:
- Check the connectivity from the computer with the command to a destination.
- See packet loss. It will indicate the quality of the connectivity between the points.
- Time for a round-trip. You can see the exact time it takes for the packets to reach the destination and provide a report.
The basic mtr command
$ mtr nexonhost.com
It will show you the basic statistics: each hop (hostnames) with time and loss%.

Show numeric IP addresses
$ mtr -g nexonhost.com
If you use “-g” you will get IP addresses (numbers) instead of hostnames. You can use the IP addresses with another tool for further diagnostic.
Show the numeric IP addresses and hostnames too
$ mtr -b nexonhost.com
Now you will see both hostnames and IP addresses. The addresses will be inside brackets.
Set the number of pings that you want to send
$ mtr -c 10 nexonhost.com
In this case, you are setting the number of pings that you want to send (10 in this case). You can set it to a big number like 1000 to check a hostname for a longer period and get a better idea of the connectivity.
Get a report of the MTR command result
$ mtr -r -c 10 nexonhost.com >mtr-command-google
or
$ mtr -rw -c 10 nexonhost.com >mtr-command-google
We do that with the “-r”. Here we have set the number of pings to 10, and the last part, “mtr-command-google”, is the name that you can change the way you like.
When you use the “-rw” you can get a cleaner report, easier on the eyes.
Time intervals between ICMP ECHO requests
$ mtr -i 10 nexonhost.com
With “-c”, we set the number of pings. With the “-i” you set the time interval between the ICMP ECHO pings.
Use TCP
$mtr –tcp nexonhost.com
Force the use of the TCP instead of the ICMP.
Use UDP
$ mtr –udp nexonhost.com
Force the use of the UDP instead of the ICMP.
Set the maximum amount of hops
$ mtr -m 35 89.41.179.2
We will use “-m” and a value of 35 to a specific IP address. You can change it to a more significant value if the query does more hops on the way.
Define the packet size
$ mtr -r -s 50 google.com
You can decide the specific packet size for the pings. In this example of a MTR command, we are using 50 bytes.
Print to CSV Output
$ mtr –csv google.com
Use it if the CSV format works better for you than the traditional report.
Print to XML Output
$ mtr –xml google.com
Use it if the XML format works better for you than the regular report.
