


How To Create RAID 1 (Mirroring)
RAID 1 is a hard disk configuration where the contents from one hard disk are mirrored onto another. This provides the user with some redundancy in case a disk fails. On your Linux system, the two hard drives are represented as a single file system.
About RAID 1, with its full name known as “redundant array of independent disks,” belongs to one of the RAID data storage technology modes. As a commonly used technology, RAID 1 aims to improve your devices’ reliability, capability, and performance and help avoid various faults and errors. When you are using RAID 1, a copy, or what is called a mirror, will be made on two or more disks, which improves the efficiency of securing data and increases the speed of reading, writing, and access.
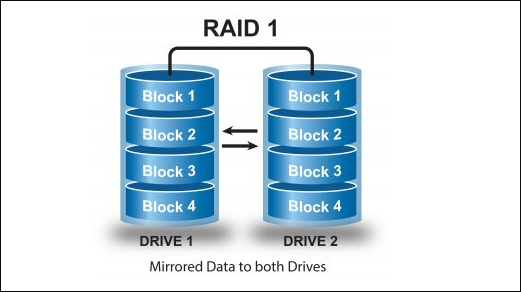
Here Half of the Space will be lost in total capacity.
Full Fault Tolerance.
Rebuilt will be faster.
Writing Performance will be slow.
Reading will be good.
Can be used for operating systems and database for small scale.
Differences Between RAID 1 and Other RAID Levels
RAID data storage technology has a total of six basic levels. By comparing RAID 1 with other RAID modes, you will have a better understanding of it. If you are not sure which RAID level is most suitable for you, you can take the following comparisons between RAID 1 and other RAID levels as a reference.
Requirements:
Minimum Two number of disks are allowed to create RAID 1, but you can add more disks by using twice as 2, 4, 6, 8. To add more disks, your system must have a RAID physical adapter (hardware card).
To create RAID 0 follow the nest steps:
Update the system and install “mdadm” package:
The mdadm is a small program, which will allow us to configure and manage RAID devices in Linux.
Creating partitions for RAID 1
I using minimum two partitions /dev/sdb and /dev/sdc for creating RAID1. Let’s create partitions on these two drives using ‘fdisk‘ command and change the type to raid during partition creation.
# fdisk /dev/sdb
Follow the below instructions
Press ‘n‘ for creating new partition.
Then choose ‘P‘ for Primary partition.
Next select the partition number as 1.
Give the default full size by just pressing two times Enter key.
Next press ‘p‘ to print the defined partition.
Press ‘L‘ to list all available types.
Type ‘t‘to choose the partitions.
Choose ‘fd‘ for Linux raid auto and press Enter to apply.
Then again use ‘p‘ to print the changes what we have made.
Use ‘w‘ to write the changes.
After ‘/dev/sdb‘ partition has been created, next follow the same instructions to create new partition on /dev/sdc drive.
# fdisk /dev/sdc
Once both the partitions are created successfully, verify the changes on both sdb & sdc drive using the same ‘mdadm‘ command and also confirm the RAID type as shown in the following screen grabs.
# mdadm -E /dev/sd[b-c]
Creating RAID 1 md devices.
Next create RAID1 Device called ‘/dev/md0‘ using the following command and verity it.
# mdadm --create /dev/md0 --level=mirror --raid-devices=2 /dev/sd[b-c]1
# cat /proc/mdstat
Next check the raid devices type and raid array using following commands.
# mdadm -E /dev/sd[b-c]1
# mdadm --detail /dev/md0
Create file-system and mount point
Create file system using ext4 for md0 and mount under /mnt/raid1.
# mkfs.ext4 /dev/md0
Next, mount the newly created filesystem under ‘/mnt/raid1‘ and create some files and verify the contents under mount point.
# mkdir /mnt/raid1
# mount /dev/md0 /mnt/raid1/
# touch /mnt/raid1/nexonhost.txt
# echo "nexonhost raid setups" > /mnt/raid1/nexonhost.txt
To auto-mount RAID1 on system reboot, you need to make an entry in fstab file. Open ‘/etc/fstab‘ file and add the following line at the bottom of the file.
/dev/md0 /mnt/raid1 ext4 defaults 0 0
Run ‘mount -a‘ to check whether there are any errors in fstab entry.
# mount -av
Next, save the raid configuration manually to ‘mdadm.conf‘ file using the below command.
# mdadm --detail --scan --verbose >> /etc/mdadm.conf
Verify Data After Disk Failure
12. Our main purpose is, even after any of hard disk fail or crash our data needs to be available. Let’s see what will happen when any of disk disk is unavailable in array.
# mdadm --detail /dev/md0ls -l /dev | grep sd
# mdadm --detail /dev/md0
ls -l /dev | grep sd
# mdadm --detail /dev/md0
cd /mnt/raid1/
# cat nexonhost.txt
Did you see our data is still available. From this we come to know the advantage of RAID 1 (mirror). In next article, we will see how to setup a RAID 5 striping with distributed Parity. Hope this helps you to understand how the RAID 1 (Mirror) Works.
