



Understanding RAID: Which Level Is Best for You
If you’ve shopped for a dedicated server or NAS device, you’ve seen RAID mentioned everywhere. This guide breaks down RAID levels explained simply, every major RAID type, the real risks for large drives, and ready-to-use Linux mdadm commands.
Key Point
RAID (Redundant Array of Independent Disks) combines multiple drives into one logical unit for better performance, redundancy, or both. There is no universally best level – only the right one for your workload.
How Each RAID Level Works

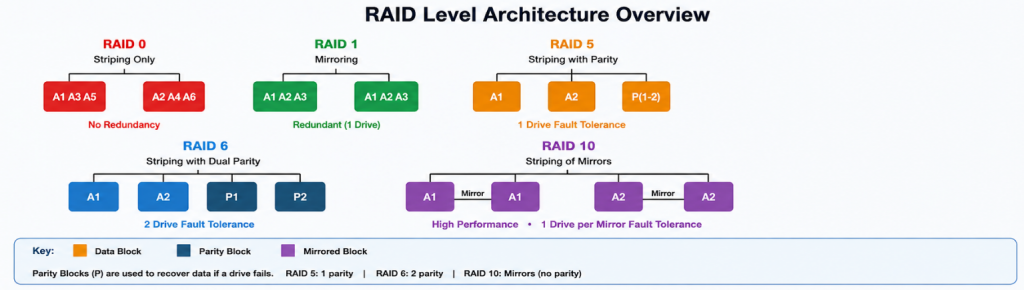
Key techniques at a glance:
- Striping (RAID 0) – data split across drives for parallel reads/writes, maximum throughput
- Mirroring (RAID 1, RAID 10) – identical copies on multiple drives, no parity math overhead
- Parity (RAID 5, RAID 6) – mathematical checksums allow reconstruction after a drive failure
RAID Level Rundown
RAID 0 – Speed, No Safety
Stripes data across all drives for maximum throughput. One drive fails – all data is gone. Use only for scratch disks, render caches, or data that is backed up elsewhere.
RAID 1 – Simple Mirroring
Writes identical data to 2 or more drives. Simplest redundancy available. Best for OS/boot drives or critical 2-drive setups. 50% storage efficiency.
RAID 5 – Distributed Parity (Small Arrays Only)
Stripes data with one parity block per stripe across 3+ drives. Offers good storage efficiency (66–94%), but rebuild risks increase significantly on large-capacity drives (typically 4TB+) due to longer rebuild times and the probability of encountering UREs (Unrecoverable Read Errors).
RAID 6 – Double Parity
Like RAID 5 with two independent parity blocks. Survives 2 simultaneous drive failures – including a read error during a rebuild. Minimum 4 drives. The safe minimum for large-capacity arrays.
RAID 10 – Stripe of Mirrors
Mirrors drives in pairs, then stripes across those pairs. No parity calculation means faster writes and shorter, safer rebuilds. Best all-round choice for large drives under high I/O. Minimum 4 drives, 50% efficiency.
RAID Level Comparison
| RAID | Min Drives | Fault Tolerance | Read | Write | Efficiency | Best For |
| RAID 0 | 2 | None | Excellent | Excellent | 100% | Speed-only, non-critical |
| RAID 1 | 2 | 1 drive | Good | Good | 50% | OS/boot drives |
| RAID 5 | 3 | 1 drive* | Very Good | Good | 66-94% | Small arrays, drives under 4TB |
| RAID 6 | 4 | 2 drives | Good | Moderate | 50-88% | 12TB/16TB drives, large arrays |
| RAID 10 | 4 | 1 per pair | Excellent | Excellent | 50% | Databases, high I/O, 12TB/16TB |
* RAID 5 fault tolerance is severely compromised on drives 4TB and above.
Large Drives (12TB/16TB): Why RAID 5 Is not recommended

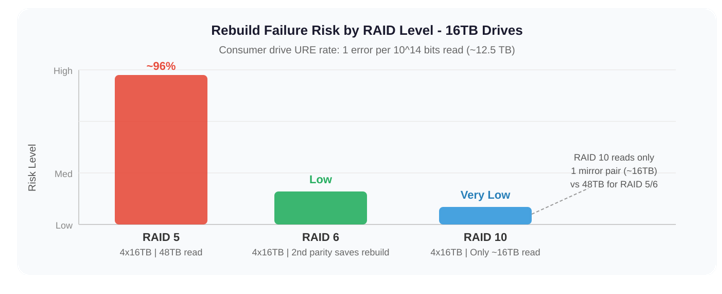
Consumer SATA drives produce 1 Unrecoverable Read Error (URE) per 10^14 bits – roughly every 12.5TB read. During a RAID rebuild, the controller reads every sector of every surviving drive. The math on large drives is brutal:
| Config | Rebuild Read Volume | UREs Expected | Outcome |
| 4x 16TB RAID 5 | ~48 TB | 3-4 UREs | CRITICAL – High probability of encountering a URE during rebuild. |
| 4x 16TB RAID 6 | ~48 TB | 3-4 UREs | SAFE – 2nd parity block recovers UREs |
| 4x 16TB RAID 10 | ~16 TB | ~1 URE | VERY SAFE – reads only the failed mirror pair |
A 16TB rebuild also takes 22-28 hours under sustained I/O. RAID 10 has a structural advantage: it only reads the failed drive’s mirror partner (~16TB) rather than the entire surviving array (~48TB), dramatically cutting both exposure time and URE risk.
Recommendation for 12TB/16TB Drives
File servers / NAS: RAID 6 (minimum 4 drives, ideally 6+) for best capacity efficiency.
Databases / high I/O: RAID 10 for fastest writes and shortest, safest rebuild.
Always use NAS or enterprise drives (IronWolf Pro, WD Red Pro, Seagate Exos, WD Ultrastar) – they have 10x better URE ratings.
Command mdadm Reference
All commands require root (sudo). Replace /dev/sdX with your actual drive names.
Install mdadm
# Debian / Ubuntu
sudo apt update && sudo apt install mdadm -y
# RHEL / CentOS / AlmaLinux
sudo dnf install mdadm -y
Check Drives Before Creating an Array
# List all block devices
lsblk -o NAME,SIZE,TYPE,FSTYPE,MOUNTPOINT
# Verify drives have no existing RAID superblock
sudo mdadm --examine /dev/sdb
Create Arrays
# RAID 6 – recommended for 12TB/16TB drives (4 drives + 1 hot spare)
sudo mdadm --create /dev/md0 --level=6 --raid-devices=4 --spare-devices=1 /dev/sdb /dev/sdc /dev/sdd /dev/sde /dev/sdf
# RAID 10 – for high I/O with large drives
sudo mdadm --create /dev/md0 --level=10 --raid-devices=4 /dev/sdb /dev/sdc /dev/sdd /dev/sde
# RAID 1 – simple 2-drive mirror
sudo mdadm --create /dev/md0 --level=1 --raid-devices=2 /dev/sdb /dev/sdc
# RAID 5 – only for drives under 4TB
sudo mdadm --create /dev/md0 --level=5 --raid-devices=3 /dev/sdb /dev/sdc /dev/sdd
Format, Mount and Persist
# Format the array
sudo mkfs.ext4 /dev/md0
# Mount it
sudo mkdir -p /mnt/raid && sudo mount /dev/md0 /mnt/raid
# Save config to survive reboots
sudo mdadm --detail --scan | sudo tee -a /etc/mdadm/mdadm.conf
sudo update-initramfs -u
# Get UUID then add to /etc/fstab
sudo blkid /dev/md0
UUID=YOUR-UUID-HERE /mnt/raid ext4 defaults,nofail 0 2
Monitor Array Status
# Quick status of all arrays
cat /proc/mdstat
# Detailed status
sudo mdadm --detail /dev/md0
# Watch rebuild progress live
watch -n 2 cat /proc/mdstat
Replace a Failed Drive

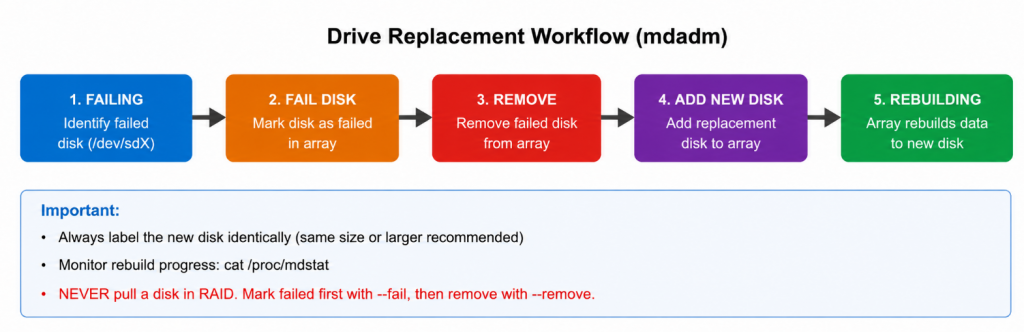
# 1. Identify the failed drive
sudo mdadm --detail /dev/md0
# 2. Mark it as failed
sudo mdadm --manage /dev/md0 --fail /dev/sdc
# 3. Remove it
sudo mdadm --manage /dev/md0 --remove /dev/sdc
# 4. Add the replacement drive (after physical swap)
sudo mdadm --manage /dev/md0 --add /dev/sdc
# 5. Monitor rebuild
watch -n 5 cat /proc/mdstat
# Optional: zero superblock if reusing the old drive elsewhere
sudo mdadm --zero-superblock /dev/sdc
Add a Hot Spare
# Standby drive – auto-rebuilds the moment any active drive fails
sudo mdadm --manage /dev/md0 --add /dev/sdf
Email Alerts for Drive Failures
# Add your email to /etc/mdadm/mdadm.conf
echo ‘MAILADDR admin@nexonhost.com’ | sudo tee -a /etc/mdadm/mdadm.conf
# Test the alert
sudo mdadm --monitor --test --oneshot /dev/md0
# Enable the mdadm monitoring service (service name may vary by distribution).
sudo systemctl enable --now mdmonitor
6. Common Mistakes to Avoid
- RAID is not a backup – it protects against hardware failure only, not deletion or ransomware
- Never use RAID 5 on drives 4TB or larger – use RAID 6 or RAID 10
- Use NAS/enterprise drives for all arrays – Enterprise/NAS drives generally provide better URE ratings and RAID firmware behavior than desktop drives.
- Add a hot spare on large arrays – reduces the degraded window from days to hours
- Run monthly scrubs – catches latent sector errors before they become catastrophic
- Always update /etc/mdadm/mdadm.conf and run update-initramfs after creating any array
- For production deployments, using GPT-partitioned drives is recommended.
Need a RAID-Configured Dedicated Server?
At NexonHost, we offer both RAID and non-RAID dedicated server options depending on your storage, performance, and budget requirements. For production workloads, we strongly recommend choosing a RAID configuration instead of running on standalone disks. RAID 10 is usually best for databases and high-I/O servers, while RAID 6 is a better fit for large-capacity storage and archive workloads. Contact us if you need help choosing the right RAID setup for your server.